Spring Meadow

Difficulty: 3
Technique: loom weaving

Woven PRECIOSA Seed Beads Necklace

We have prepared a manual for the production of a woven PRECIOSA seed bead necklace for spring inspiration. You can easily count the individual colors of the seed beads for each row according to the graphic design (fig. no. 2a) You can design you own colour combinations using grid paper, while the more advanced of you will no doubt try your own designs. We wish you pleasant springtime bead stringing!


Helena Chmelíková

She is able to switch from luxurious and extravagant fashion show pieces to the preparation of hobby projects,

Learn More

Materials & Tools

Metal fastenings

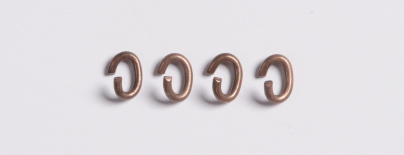
Connecting pieces (ovals, rings)

Metal fastenings

Snap hooks

Metal fastenings

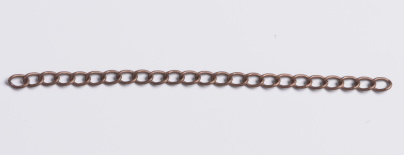
A chain (part of the chain with larger eyes – the option of shifting the length of the pattern)
Metal fastenings

Thread (on a ball at the end of the chain)

Metal fastenings

A double - hole calotte (it hides the final knot in the necklace)

Metal fastenings

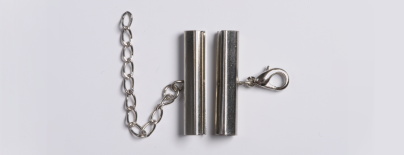
A terminating metal part in the case of the straight variant of the ends of the product
Tools

Medium-strength thread; a loom (bought or home - made); scissors; a ruler (a distance measuring device); a needle – a long thin one; thin nosed pliers; flat pliers (for closing the calotte)

Procedure

Production of the Loom

Material: a wooden board (the length according to the product – necklace about 70 cm, belt 120 cm, bracelet 60 cm, etc.); long nails or strong pins with small heads or it will be necessary to clip the heads off; a hammer.

Fast and simple production: hit the nails into the end of the boards as close as possible together in the necessary amount (according to the number of seed beads in a single row).

Step 1

Tightening the warp

The amount of thread depends on the amount of seed beads in a single row + one outer thread - the length depends on the type of termination and the size of the chosen product.

Terminating the product

a) termination with the overcasting of the warp – add 15 - 20 cm to the length of the pattern on each side for easy handling during overcasting

b) termination with a plaited thread – add 25 cm on each side of the product for tying the bow

c) termination with an appropriate metal part – without adding to the length of the thread

1

Step 2

Weaving

Thread the thread through the eye of the needle (rip the thread off: a thin, pointed end will be created and you should carefully trim this). String the necessary amount of seed beads in the colours according to the design; draw them onto the thread, press from the bottom to the warp (a gap between the seed beads – one thread from the warp), from the upper side of the warp - pass the thread back through the seed beads (the warp is reinforced between the upper and lower thread of the weft) and start again from the centre - the last thing is to create an oblique termination, take off one seed bead from each side until only two remain: when passing from a longer row to a shorter one, we pull through the bottom of the outer seed bead of the longer row./p>

Connecting threads

First weave part of them, then tie the threads at the side of the product with two knots and pull them into the seed beads.

2 / a

Step 3

Terminating the weft at the ends

Pass the thread through several central seed beads from the end in several consecutive rows; form a knot on the warp, twist a thread around the thread and pass through it twice, - shift two seed beads in on the next row and repeat the procedure with the knot and pull the thread into the seed beads and cut it.

3 / a

Step 4

Terminating the product

a) overcasting the warp - string one seed bead onto the third thread from the centre on both sides and then string a calotte with the three central threads and tie a larger knot (two knots one after the other), then proceed from the centre along both sides up to the regular width of the product, tie two warp threads in two consecutive rows with two or three knots and string one seed bead on the thread from the longer row and pull the end of the thread into the bead; at the end, only the outer threads of the warp will remain. Also thread one pearl onto them, pull both threads into the appropriate row until they meet in the middle, tie them, pull the ends of the thread into several other beads and cut them, return to the calottes, cut the threads directly behind the knot, press both semi-circles together using the flat pliers, create an eye on the calotte, into which you can connect the snap hook from one side using the ring or the oval and the chain with the woven on decorative bead at the end from the other side

4

Step 5

b) the plaited warp – the warp threads at each end are tied in a knot at the point, they are divided into three sets of thread and are plaited into a braid with the length according to the ribbon binding

c) termination with a suitable metal part – tie the warp threads in the woven product with straight rows at the beginning and the end using strong knots in twos, cut the thread leaving a reserve of about 1 cm and hide it in the suitable metal part which has been woven onto one side of the chain with the bead and on the second side of the snap hook. 

5 / a

Downloads

This website is using cookies

To improve our services and provide information that suits your interest, we use the advanced website traffic analytics tools. However, we need your consent. More information about how we process and protect your data can be found in the privacy statement. We ask you for approval of the terms.

Functional cookies These cookies are necessary for the proper functioning of the website and therefore cannot be turned off.
Analytics cookies Analytical cookies help us track and analyze the way visitors interact with our site in Google Analytics 4. This information allows us to improve content and provide a better user experience.
Marketing cookies Reading and writing cookies for marketing purposes for advertising systems such as Google Ads or Sklik. These cookies allow us to track user behavior and measure website performance and the effectiveness of our advertising campaigns.
Personalized advertising Remarketing cookies allow us to present you with personalized advertising based on your previous interactions with our site in systems such as Google Ads, Sklik.
Use of personal data With this option, you consent to the sending and processing of your personal data to Google for the purposes of targeting and evaluating online advertising and targeted marketing.