Fire Bird

Difficulty: 4
Technique: Loom Weaving

Woven bracelet made from charlotte beads

Our tutorial will teach you how to create woven accessories from seed beads. The weaving system is simple and merely requires patience and a good idea of what the resulting motif should look like. This will subsequently enable you to design your own original accessories. We also have a simple tip on how to make your own weaving loom.

The fire bird bracelet gives the impression of a luxurious fashion accessory thanks to its elegant motif, the combination of gold and navy blue and the delicate texture of the very fine cut seed beads and charlotte beads neatly woven in regular rows. It all comes together in the spirit of the first decade of last century. Don’t be afraid to combine it with contemporary fashion, because there can never be too much elegance.

We wish you many happy hours spent working with beads and seed beads from the PRECIOSA Traditional Czech BeadsTM brand.

Ambassadors

Helena Chmelíková

She is able to switch from luxurious and extravagant fashion show pieces to the preparation of hobby projects,

Learn More

Materials & Tools

Other materials

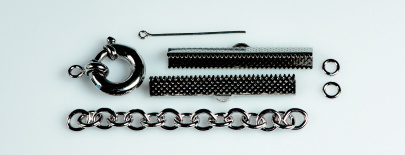
all the parts are platinum – ribbon hangers (4 cm), a larger buckle for effect, 5 mm rings, an adjusting chain, an eye pin (the termination of the adjusting chain)
Tools

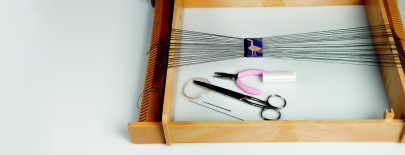
scissors, a very thin needle with a small eye, a small loom, a medium sized line for the warp (polyester, cotton), a 0.10 mm nylon line for the weft, flat nose pliers (for closing the rings and hangers), a thicker needle for the end band which absorbs the fast drying adhesive 
Procedure

A woven bracelet at a total length of 18.5 cm – the woven section is 14 cm consisting of 36 rows. Set up 37 warp threads.

Step 1

The loom
The most suitable loom consists of a large number of nails. Otherwise, it is possible to make the warp with doubled threads placed in grooves. It is best, if the warp can be loosened and tightened. You can make your own simple loom. For the bracelet, you will need a board, which is about 30 cm long and 10 cm wide, and some small upholstery nails. Knock the nails into the narrow end of the board and set them out in lines in the shape of pointed teeth. Clump them together as densely as possible so that you do not have any problems with an overly tight warp.
 

1

Step 2

Weaving
String up the warp. Tie the thread to the comb and pull it to the second end and back. Repeat this until you have 37 strung threads. You should reckon with the fact that the warp will loosen and as such you should twist the combs towards the base. Thread the nylon line through the eye of the needle and secure it with a single knot. String a column of cut rocailles according to the illustration.

2

Step 3

Apply it from the bottom of the warp. Press it through the warp threads and pass through the seed beads above the warp threads. String the entire bracelet in this way. When tightening the first column, it may be necessary to loosen the warp. Be careful not to overly loosen it, as the warp made slide off the comb! If you want to change the length of the bracelet and maintain its central symmetry, start the stringing from the centre. Adjusting the nylon line. String a column of cut rocailles. Place the ends of the completed line and the new line together and make a knot about 10 cm from the ends and as close as possible to the strung section. Create a loop and thread the ends through. Secure with a simple knot and tie both ends together. Pass the line through the rocailles above the warp. Carefully pull in the knot. Cut off the remainder of the line.

3 / a

Step 4

Completion 
Sew the line in after completing the rocaille section. Create the edges which are placed in the hanger. Weave a band which is about 0.5 cm wide. Interlace the same thread as the one threaded in the thicker needle on the warp through the warp. Start in the middle of band and thread through to the edge and back to the second edge and constantly repeat. Glue the band with fast drying adhesive. Once it has dried, cut off the remaining thread from the band. Also cut off the warp and align it with the edge of the band. Place the band in the metal hanger and crimp it. You can use flat nose pliers or a light tap with a rubber mallet for this. Affix the fastening onto the loops on the hangers using the rings.

4 / a

Downloads

This website is using cookies

To improve our services and provide information that suits your interest, we use the advanced website traffic analytics tools. However, we need your consent. More information about how we process and protect your data can be found in the privacy statement. We ask you for approval of the terms.

Functional cookies These cookies are necessary for the proper functioning of the website and therefore cannot be turned off.
Analytics cookies Analytical cookies help us track and analyze the way visitors interact with our site in Google Analytics 4. This information allows us to improve content and provide a better user experience.
Marketing cookies Reading and writing cookies for marketing purposes for advertising systems such as Google Ads or Sklik. These cookies allow us to track user behavior and measure website performance and the effectiveness of our advertising campaigns.
Personalized advertising Remarketing cookies allow us to present you with personalized advertising based on your previous interactions with our site in systems such as Google Ads, Sklik.
Use of personal data With this option, you consent to the sending and processing of your personal data to Google for the purposes of targeting and evaluating online advertising and targeted marketing.