Cob

Difficulty: 3
Technique: Beadweaving

Bracelet and earrings made from PRECIOSA Chilli™

Preciosa Ornela presents the PRECIOSA Chilli™ Pressed Bead from the PRECIOSA Traditional Czech Beads™ brand.
This extended imaginative shape supplements the popular range of two-hole beads. The axially misaligned placement of both holes means that these beads are easily placed in the form of a cob during stringing, as the protrusions on the beads slide excellently
into the dimple on the side of the adjacent bead. This new bead is suitable for all types of surface finishes. Choose a suitable color
combination and try creating a relatively simple, but highly interesting bracelet or attractive earrings. It is sure to become your favourite costume jewelry accessory.

Ambassadors

Helena Chmelíková

She is able to switch from luxurious and extravagant fashion show pieces to the preparation of hobby projects,

Learn More

Materials & Tools

Other Materials & Tools

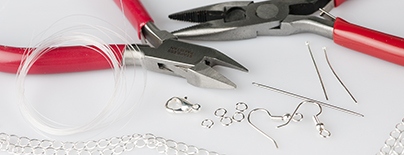
A carabiner; a 7 cm adjusting chain; 5 – 6 mm rings; earring hooks; long eye pins a thin needle; a 0.20 mm nylon line; flat nose pliers (flattening the end of the line, closing the rings); snipping pliers
Procedure

The Chilli beads are two row beads. They have one hole at the edge of the bead, while their second hole is closer to the centre of the bead. They are highly textured. A ridge extends on one side and there is a corresponding dimple on the other side.

The bracelet

Step 1

String the first Ch through the outer hole on the ridge. Secure the Ch. Thread the end of the line through the hole once again.

1

Step 2

Also string the second Ch from the ridge, but using the second hole. Also thread the line through the outer hole in the dimple. Exit with the line in the direction from the ridge.

2

Step 3

String through the outer hole on the ridge of the third Ch. Also string the fourth Ch from the ridge, but via the central hole. Also thread the line through the outer hole in the dimple. Exit with the needle in the direction away from the ridge.

3

Step 4

Repeat Step 3 with new beads until you have strung 58x beads (29 pairs of beads). The Ch will arrange themselves in the form of a „V“ in the opposite direction of the stringing.

4

Step 5

String 59th Ch through the outer hole from the ridge.

5

Step 6

Create a rocaille loop. String 6x R10. Thread the line through the adjacent 58th Ch. Thread the line through its outer hole in the dimple. Return to the 59th bead. Once again, thread the line through the loop from the R10, the 58th and 59th beads.

6 / a

Step 7

Also thread the line through the central hole in the dimple. Thread the line through the outer hole from the dimple in the bead above it (the 56th bead).

7

Step 8

Thread the line through the outer hole on the ridge of the adjacent Ch (the 57th bead). Also thread it through the central hole in the dimple. Thread the line through outer hole in the dimple of the Ch above it (the 54th bead).

8

Step 9

Repeat Step 8 up to the 2nd and 3rd beads. This will give rise to lines of Ch, left and right. Alternate them during sewing.

9

Step 10

Add the 60th bead. String it through the outer hole in the dimple. Thread the line through the outer hole on the ridge 1x. Then thread it through the central hole in the dimple.

Step 11

Create a rocaille loop. String 4x R10. String the 60th Ch through the central hole on the ridge. Also thread the line through the outer hole of this Ch from the dimple. Thread the line through the outer hole on the ridge of the adjacent Ch, as well as through the central hole in the dimple (1x). Once again thread the line through the R10 and through both holes of the 60th bead.

11 / a

Step 12

Release the secured first bead. Tie off both ends of the line. Sew it in and pull it into the surrounding Ch.

Step 13

Connect the fastening using the rings. Connect a carabiner with two rings on one end. Connect both ends of the adjusting chain to the ring on the opposite end.

13 / a

Earrings

Proceed similarly as in the case of the bracelet.

Step 14

String 4x Ch (Step 1 - 3 for the bracelet).
 

14 / a

Step 15

String the 5th bead.

Create a loop from 6x R.

Sew through the strung Ch up to the 2nd bead.

Add the 6th bead.

Create a loop from 4x R. Sew it in.

Hang an earring hook and an eye-pinned bead.

15 / a

Downloads

This website is using cookies

To improve our services and provide information that suits your interest, we use the advanced website traffic analytics tools. However, we need your consent. More information about how we process and protect your data can be found in the privacy statement. We ask you for approval of the terms.

Functional cookies These cookies are necessary for the proper functioning of the website and therefore cannot be turned off.
Analytics cookies Analytical cookies help us track and analyze the way visitors interact with our site in Google Analytics 4. This information allows us to improve content and provide a better user experience.
Marketing cookies Reading and writing cookies for marketing purposes for advertising systems such as Google Ads or Sklik. These cookies allow us to track user behavior and measure website performance and the effectiveness of our advertising campaigns.
Personalized advertising Remarketing cookies allow us to present you with personalized advertising based on your previous interactions with our site in systems such as Google Ads, Sklik.
Use of personal data With this option, you consent to the sending and processing of your personal data to Google for the purposes of targeting and evaluating online advertising and targeted marketing.