Caribbean cruise

Difficulty: 3
Technique: Basic Beadweaving, linking, Stringing

Instep decoration

This piece of untraditional costume jewellery with small stars in its central section has been created using beads and seed beads in a colour combination corresponding to the Preciosa Ornela colour trends for spring and summer 2013.
The main colours are sulphur yellow, purple, clear aquamarine, false topaz, hyacinth, scarlet and coral orange.

Ambassadors

Helena Chmelíková

She is able to switch from luxurious and extravagant fashion show pieces to the preparation of hobby projects,

Learn More

Procedure

First create the individual stars which will then be attached to the flexible stringing. This will create a highly effective and untraditional decoration for the insteps of bare feet.

Step 1

Start the individual stars by alternately stringing 1x T and 1x R10 onto the thin line. String a total of 5x T and 5x R10. Tie the strung seed beads into a circle. (figure no. 1 – the first row)

1

Step 2

Thread the needle and the line through the second hole of the nearest T from the first row. In the second row, string 1x T, 1x R and 1x T above the rocailles and between the T from the first row; add a total of 10x T and 5x R10 in the second row. (figure no. 2 – row two).

2

Step 3

Now pass from one point of the star to the next one.
Thread the needle and the line through three T lying next to one another in the second row. String 1x R10. Thread the needle and the line through the second hole of the outer twin. Add 1x T to the gap and thread the needle and line through the second hole of the side T. String 1x R10. Thread the needle and the line through the second hole of the middle twin. Add the missing rocailles onto the point. String 1x R10 and thread the needle and the line through the same hole, but from the opposite side. String 1x R10. Thread the needle and the line into the side T from the 3rd row and then thread it through the entire row. Add 1x R10 and thread the needle and the line into the second hole of the same T. String 3x T, 1x R10 and 3x T from the second row. Continue to the next point. (figure no. 3 – the points). There are 5 points on each star. Create 2 stars in each colour shade.

3 / a

Step 4

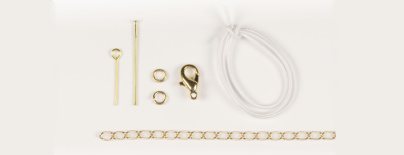
String the cut MCB8/6 and 1x R10 onto the eye pin and create a loop. Place it in the centre of the star. String 1x R10 onto an eye pin, thread it through the created loop by the eye pin and add 1x R10. Create a loop. String the outer star directly onto the loop of the central eye pin (figure no. 4 – the linking detail).  
Connect the MCB8 to the yellow and pink stars (1x for each shade) and the MCB6 to the other stars: yellow and turquoise with orange and pink with turquoise. Place the star with the MCB8 in the centre of the instep decoration. The turquoise stars only have a 6 mm orange centre (MCB6). 

4 / a

Step 5

String the thin thread or line into the eye of the needle and tie it off. Create a loop and pass the elastic through it. 
Start with the loop; string 40x R6 onto the elastic. Pull out the elastic to a length of 20 cm on one side. Continue with the other section. Thread the elastic into the eye  on the central eye pin (the turquoise star). String 7x R6. Thread the elastic through the eye pin’s eye (the dark pink star). Add the next star (the yellow transparent star) and thread the elastic through the eye of the eye pin once more. String 7x R6 again and add the matt yellow star. Now, it is time to make the fastening. String 5x R6. Add the light pink star. Add 7x R6 and the turquoise star. Once again string 7x R6 and then the outer yellow matt star. String 7x R6 and both ends of the adjustable chain.

5 / a

Step 6

Begin the return to the centre. String 7x R6, the star and 7x R6 between them. String 5x R6 in the middle. Create the second side of the fastening. String the yellow transparent star and 7x R6. Continue with the dark pink star, 7x R6 and the light pink outer star. String 1x R6, 1x R33, 14x R6/0, 1x R33 and 7x R6. Add the counter ring and start the return. String the same number of beads, but in the opposite order. String the outer star and the next two stars with 7x R6 between them. Add the section leading from the toes on the shorter end of the elastic. Thread the elastic through the outer star. String 7x R6, the pink star, 7x R6, the yellow star, 7x R6 and the yellow star again. String 5x R6 at the end. (figure no. 5 – the stringing detail). Gently tighten the elastic by means of gradual tugging. Tie both ends of the elastic with three knots and cut it off. Hide the knot and the end under the star. Connect the carabiner onto the counter ring using the ring.
Create the second instep decoration in the same way, but as a mirror image. Swap over the sides with the fastening.

6 / a

Downloads

This website is using cookies

To improve our services and provide information that suits your interest, we use the advanced website traffic analytics tools. However, we need your consent. More information about how we process and protect your data can be found in the privacy statement. We ask you for approval of the terms.

Functional cookies These cookies are necessary for the proper functioning of the website and therefore cannot be turned off.
Analytics cookies Analytical cookies help us track and analyze the way visitors interact with our site in Google Analytics 4. This information allows us to improve content and provide a better user experience.
Marketing cookies Reading and writing cookies for marketing purposes for advertising systems such as Google Ads or Sklik. These cookies allow us to track user behavior and measure website performance and the effectiveness of our advertising campaigns.
Personalized advertising Remarketing cookies allow us to present you with personalized advertising based on your previous interactions with our site in systems such as Google Ads, Sklik.
Use of personal data With this option, you consent to the sending and processing of your personal data to Google for the purposes of targeting and evaluating online advertising and targeted marketing.