Nice Christmas decoration

Difficulty: 3
Technique: sewing, stringing

Christmas tree made from PRECIOSA Terra Intensive Lining seed beads

Good things come in small packages! Would you like to make your own, unique Christmas decoration this year? We have a tip that will show you how to make a miniature Christmas tree out of PRECIOSA Terra Intensive Lining seed beads. Make this cute little Christmas tree to adorn your home or as a gift. All you need is a little creativity and to follow the tutorial. Create a magical Christmas tree with Czech seed beads!

Ambassadors

Helena Chmelíková

She is able to switch from luxurious and extravagant fashion show pieces to the preparation of hobby projects,

Learn More

Material and Tools

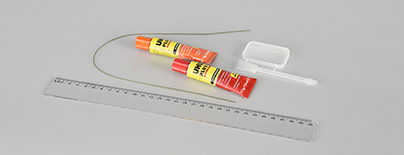
Materials

0.5 – 0.7 mm florist wire (40 cm long, green); a ruler; a two-component epoxy adhesive
Tools

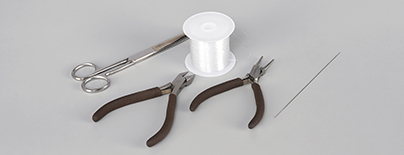
A 0.25 mm nylon line; a thin needle; scissors; scissors with a rounded point; snipping pliers
Procedure

Step 1

Create the individual floors.

the 1st floor
String 6x R10G onto the line. Thread the line through the R10G one more time. Tie off both ends with double knots. Pull the ends into 3x R10G. One to the left and one to the right. This will create a circle.

/ a

the 2nd floor
Create a circle using the same procedure as in the 1st floor, but this time use 6x R8.

the 3rd floor
Create a basic circle out of 6x R10G, but do not tie off the ends. Thread the line through one R10G. String 2x R10G above each one. Tie off the ends in the basic circle and pull them into the surrounding R10G.

/ a

the 4th floor
Proceed in the same way as in the 8th floor. String 1x R10G as projections.

/ a

the 5th floor
Proceed in the same way as in the 8th floor. String 2x R10G as projections.

the 6th floor
Proceed in the same way as in the 8th floor. String 3x R10G as projections.

the 7th floor
Proceed in the same way as in the 8th floor. String 4x R10G as projections.

the 8th floor
Create a basic circle out of 6x R10G, but do not tie off the ends of the lines. String the R10G one at a time. String 2x R10G above each one. Thread the line through the first R10G of the last 2 strung R10G. String 5x R10G. Omit the last strung 1x R10G. Thread the line back through the other 4x R10G. Continue to the next pair of R10G. Create another projection. Continue in this way above all the other pairs of R10G. Having created six projections, connect the first pair of R10G and 1x R10G from the basic circle. Tie off the ends of the line. Pull the ends into the surrounding R10G.

/ a

the 9th floor
Proceed in the same way as in the 8th floor. String 6x R10G as projections.

the 10th floor
Proceed in the same way as in the 8th floor. String 7x R10G as projections.

the 11th floor
Proceed in the same way as in the 8th floor. String 8x R10G as projections.

the 12th floor
Proceed in the same way as in the 8th floor. String 9x R10G as projections.

the 13th floor
Proceed in the same way as in the 8th floor. String 10x R10G as projections.

the 14th floor
Proceed in the same way as in the 8th floor. String 11x R10G as projections.

the 15th floor
Proceed in the same way as in the 8th floor. String 12x R10G as projections.

the 16th floor
Proceed in the same way as in the 8th floor. String 13x R10G as projections.

the 17th floor
Proceed in the same way as in the 8th floor. String 14x R10G as projections.

the 18th floor
Proceed in the same way as in the 8th floor. String 15x R10G as projections.

Step 2

Create two R10B circles in the same way as in the 1st floor.

2

Step 3

Snip the 40cm length of florist wire in half. Fold the 20 cm length of wire in half. Grip the wire in the centre with the round-nosed pliers. Create an eye around the point. Start twisting both ends of the wire around each other. End the twisting 4.5 cm from the eye. Bring the ends of the wire together. String all the floors onto it via the central opening. Add the two circles from Step 2. Finally, string the WB. Snip off the wire behind the WB. Remove the WB. Check that the ends of the wire form a V-shape. If not, gently prise them apart. Ensure that the tree is stable. Apply the glue to the hole in the WB. Insert the ends of the wire and leave it to dry.

3 / a

Downloads

This website is using cookies

To improve our services and provide information that suits your interest, we use the advanced website traffic analytics tools. However, we need your consent. More information about how we process and protect your data can be found in the privacy statement. We ask you for approval of the terms.

Functional cookies These cookies are necessary for the proper functioning of the website and therefore cannot be turned off.
Analytics cookies Analytical cookies help us track and analyze the way visitors interact with our site in Google Analytics 4. This information allows us to improve content and provide a better user experience.
Marketing cookies Reading and writing cookies for marketing purposes for advertising systems such as Google Ads or Sklik. These cookies allow us to track user behavior and measure website performance and the effectiveness of our advertising campaigns.
Personalized advertising Remarketing cookies allow us to present you with personalized advertising based on your previous interactions with our site in systems such as Google Ads, Sklik.
Use of personal data With this option, you consent to the sending and processing of your personal data to Google for the purposes of targeting and evaluating online advertising and targeted marketing.