Snow Queen Bauble

Difficulty: 4

Snow Queen Bauble Decoration

This tutorial will take you through the production of an original and luxurious Christmas decoration step by step.

Elevate the glass Christmas bauble by decorating it with delicate seed bead lace. In a trice, the glass bauble will be transformed into the snow queen among the other Christmas decorations. We wish you a merry Christmas with PRECIOSA Traditional Czech Beads™.

Julie Ashford

Julie has been creating jewellery and decorative items with beads for over 35 years.

Learn More

Procedure

The Decoration is Made in Five Stages.
The six Large Snowflake motifs are made first.
A single long dangling strand is added to three of the large motifs.
The remaining three Large Snowflakes are decorated with three shorter dangling strands.
A Foundation Row is added to the neck of the bauble which supports the prepared motif sets.
The Hanging Loop is added to the top of the bauble.

The design is worked with a single thickness of thread throughout.

Step 1

The Large Snowflakes

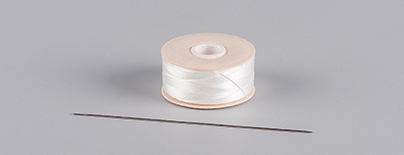
Prepare the needle with 1.2 m of single thread and tie a keeper bead (temporary anchor) 15 cm from the end.

1

Step 2

Thread on 6T. Pass the needle through the same hole on the first T again to make a ring of 6T (fig 2a).
Pass the needle through the T seed beads again to make the work firm - make sure you are passing through the same holes as before. 

The needle now transfers to the outer row of holes.
Following fig 2b pass the needle through the outer hole of the current T making a strap of thread to the side of the seed bead. The next row is worked through the outer holes only.

2 / a

Step 3

Thread on 1R10, R8 and 3R10. Pass the needle back through the R8 to bring the 3R10 into a picot (fig 3a).

Thread on 1R10 and pass through the outer hole on the next T around (fig 3b).

Repeat five times to add six picots in total (fig 3c).
This completes a small snowflake motif - to make the Large Snowflake you need to add another two rows of beading.

3 / a

Step 4

Referring to fig above pass the needle through the following 1R10, 1R8 and 1R10 to point away from the centre of the motif. The next row attaches to the R10 seed beads at either side of each picot.

4

Step 5

Thread on 1R10, 1T, 1R10, 1T and 1R10. Referring to fig 5 pass the needle down through the R10 to the side of the previous picot, the R8 below it and the following 1R10, 1T, 1R10 and 1R8. Pass out through the R10 to the opposite side of the first picot.

5

Step 6

Thread on 1R10, 1T, 1R10, 1T and 1R10. Following fig 6 pass the needle down the R10 to the side of the next picot around, the R8 below it and the following 1R10, 1T, 1R10, 1R8 and the R10 to the nearest of the next picot around (fig 6).
The needle is now positioned as in fig 4 (emerging from the R10 seed bead to the side of a picot ready to make the stitch to the previous picot).
Repeat Steps 5 and 6 followed by another repeat of Step 5.

6

Step 7

Thread on 1R10, 1T, 1R10, 1T and 1R10. Following fig 7 pass the needle down through the R10 to the side of the next picot around, the R8 below it and the following 1R10, 1T, 1R10 and 1R8 as before. Now pass through the R10 to the far-side of the next picot around and the following 1T, 1R10 and 1T (fig 7).
Pass the needle through the outer hole of this T seed bead (as fig 2b).

7

Step 8

The next row attaches to the outer holes of the last row of T seed beads.
Thread on 1R10, 1R8 and 3R10. Pass the needle back down the R8 and thread on 1R10. Pass the needle through the outer hole of the adjacent T to make a picot as before (fig 8).

8

Step 9

Following fig 9, pass the needle through the inner hole of the current T and the following 1R10, 1T, 2R10, 1R8, 1R10, 1T of the first ring, 1R10, 1R8, 2R10 and the 1T, 1R10, 1T of the next 2T around the motif. Pass through the outer hole on this T seed bead to be ready to add the next picot (fig 9).

9

Step 10

Referring to fig 10, thread on 1R10, 1R8 and 3R10. Pass the needle back down the R8 and thread on 1R10. Pass the needle through the outer hole of the adjacent T to make a picot as before.
Pass through the inner hole of this T and the following 1R10, 1T, 2R10, 1R8, 1R10, 1T of the first ring, 1R10, 1R8, 2R10, 1T, 1R10 and 1T. Pass through the outer hole on this T ready to make the next picot (fig 10).
Repeat Steps 8, 9 and 10 twice to add the remaining picots to the last four pairs of T seed beads around the motif. Leave the thread end loose and remove the needle.
Repeat steps 1 to 10 five more times to complete a set of six large motifs.

10

Step 11

The Long Fringe Strand Snowflakes

Select the motif with the longest thread end - is the thread at least 75 cm long ? If it is, attach the needle to this thread end. If not, attach a new 1 m thread end - pass the needle through the seed beads of the motif to emerge from the tip of a picot (fig 11).

11

Step 12

Thread on 1R8, 60R10, 1R8, 1FPB2, 1R8, 1R10, 1R8, 1FPB1, 1R8, 1R10, 1R8, 5R10, and 1T.
Pass the needle through the other hole in the T making a strap of thread to one side (fig 12a).
*Thread on 5T and pass through the same hole on the first T to make a ring as before (fig 12b). Pass the needle through the 6T once more to make the ring firm.
Pass the needle through the outer hole of this T (fig 12c). Repeat Step 3 to convert this ring of 6T into a Small Snowflake motif.

12 / a

Step 13

Following fig 13a reposition the needle to emerge from the outer hole of the fourth T (opposite the string of 60R10), (fig 13a).
Thread on 5R10, 1R8, 1FPB2, 1R8, 1FPB3 (wide end first), 1R8, 1FPB1, 1R8 and 3R10. Leaving aside the last 3R10 to anchor the strand pass the needle back up the last R8 and the following 1FPB1, 1R8, 1FPB3, 1R8, 1FPB2, 1R8 and 4R10 (fig 13b).
Thread on 1R10, pass through the T on the ring and reposition the needle to emerge from the outer hole of the first T in the ring (fig 13c).

13 / a

Thread on 1R10. Pass up the second R10 above the T and the following seed beads to the edge of the large motif. Pass through the R10 at the tip of the large motif in the same direction to centralise the strand below the picot (fig 14).*
Pass the needle through to the centre of the motif and finish off the thread end neatly and securely. Finish off the remaining thread ends on the motif similarly.
Repeat Steps 11 to 14 with two more Large Snowflake motifs and set aside for the moment.

14

The Three Fringe Strand Snowflakes

Attach a new 1.2 m thread to the fourth Large Snowflake motif to emerge as in fig 11 from the tip of a picot. Thread on 1R8, 1FPB1, 1R8, 1R10, 1R8, 1FPB2, 1R8, 1R10, 1R8, 5R10, and 1T.
Pass the needle through the other hole in the T making a strap of thread to one side (as fig 12a).
Repeat from the * in Step 12 to the * in Step 14. Reposition the needle to emerge from the tip of the next picot point around the motif (fig 15).

15

Thread on 1R8, 29R10, 1FPB1, 1R8, 3R10, 1R8, 1FPB1, 1R8, 1R10, 1R8, 1FPB2, 1R8, 1FPB3 (wide end first), 1R8, 1FPB1, 1R8 and 3R10. Leaving aside the last 3R10 to anchor the strand pass the needle back up through the last R8 and the following beads just added to emerge at the first R8. Pass the needle through the R10 at the tip of the snowflake picot in the same direction as before (fig 16a).
Reposition the needle to emerge from the R10 at the tip of the picot to the other side of the small snowflake strand and repeat Step 16 (fig 16b). Finish off all thread ends neatly and securely.
Repeat Steps 15 and 16 twice to complete the last two motifs.

16 / a

The Foundation Row

Thread on six repeats of 1R8 and 4R10. Pass the needle through the first R8 again to bring the seed beads into a ring (fig 17a).
Place the ring over the neck of the bauble - it needs to fit snugly without the thread showing between the seed beads. If you need to make an adjustment, add or subtract R10 seed beads equally from all six sections to keep the R8 seed beads evenly spaced around the ring (fig 17b).
Pass the needle through the seed beads again to make the ring firm.

17 / a

The ring connects to the top picot on each of the prepared Large Snowflake motifs. The needle should pass through the R10 at the tip of the picot so the dangling strands are centralised below the motif.
The three Large Snowflakes with the single long strand are added first.
Thread on 10R10 and 1R8. Pass the needle through the top R10 at the tip of the first Large Snowflake (with a single strand at the bottom) and back up through the R8. Thread on 10R10 and pass through the second R8 around the bauble neck (fig 18). Repeat three times to attach all three of these motifs on V-shape supports.

18

The 3-strand Large Snowflake motifs are now added into the gaps.
Pass the needle through the first 3R10 of the following V-shape support (fig 19a). Thread on 20R10 and 1R8. Pass the needle through the R10 at the tip of the first 3-strand motif. Pass back up the R8 just added and the following 17R10 (fig 19b).

19 / a

Thread on 3R10. Pass up through the last 3R10 of the previous V-shape support, the R8 on the foundation row and the following ring seed beads to emerge 2R8 further around the ring (fig 20). Repeat Steps 19 and 20 two more times to attach the remaining snowflakes.

20

The Hanging Loop

Repeat Steps 1, 2 and 3 to make a small snowflake motif. Finish with the needle emerging from a T as in fig 3b.
Thread on 3R10, 1R8, 1FPB4, 1R8 and 1R10. Pass the needle through the loop at the top of the bauble and back up through the 1R10, 1R8, 1FPB4, 1R8 and last 2R10 of the 3R10 just added (fig 21). Thread on 1R10 and pass through the T on the snowflake as before.
Pass the needle through the beads of this connection to the bauble loop two or three more times to strengthen the link. Reposition the needle to emerge from the outer hole on the opposite T.

21 / a

Thread on 3R10, 1R8, 1FPB1, 1R8 and 50R10. Pass the needle back down the 1R8, 1FPB1, 1R8 and the first 2R10 of the 3R10 just added. Thread on 1R10 and pass through the hole in the T (fig 22).
Pass the needle through the beads of this connection and the loop two or three more times to strengthen the link.
Finish off all remaining thread ends neatly and securely.

22 / a

Downloads

Gallery

/ a

This website is using cookies

To improve our services and provide information that suits your interest, we use the advanced website traffic analytics tools. However, we need your consent. More information about how we process and protect your data can be found in the privacy statement. We ask you for approval of the terms.

Functional cookies These cookies are necessary for the proper functioning of the website and therefore cannot be turned off.
Analytics cookies Analytical cookies help us track and analyze the way visitors interact with our site in Google Analytics 4. This information allows us to improve content and provide a better user experience.
Marketing cookies Reading and writing cookies for marketing purposes for advertising systems such as Google Ads or Sklik. These cookies allow us to track user behavior and measure website performance and the effectiveness of our advertising campaigns.
Personalized advertising Remarketing cookies allow us to present you with personalized advertising based on your previous interactions with our site in systems such as Google Ads, Sklik.
Use of personal data With this option, you consent to the sending and processing of your personal data to Google for the purposes of targeting and evaluating online advertising and targeted marketing.