Luxurious Valentine

Difficulty: 4
TECHNIQUE: beadweaving

Effective necklace made from fire polished beads

Fire polished beads from the PRECIOSA Traditional Czech Beads™ brand are an inherent part of the standard range of glass beads offered for the creation of costume jewelry accessories.

The glint of classically faceted beads always provides a luxurious appearance and an elegant impression. The perfect lacy working of the necklace sewn using three sizes of fire polished beads requires experience and a patient and precise approach on the part of the beadworker.

Ambassadors

Helena Chmelíková

She is able to switch from luxurious and extravagant fashion show pieces to the preparation of hobby projects,

Learn More

Material and Tools

Materials

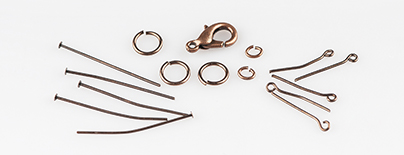
Copper metal parts: 14 mm eye pins; a 16 mm eye pin; 6 or 8 mm rings; ovals or smaller rings; a carabiner
Tools

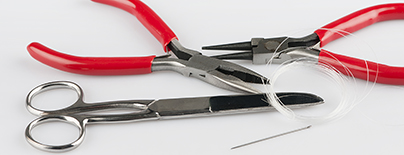
A 0.20 mm nylon line; a thin needle; scissors; needle nose pliers; flat nose pliers (flattening the start of the line, straightening the eyes during linking, the closure of the rings and the ovals)
Procedure

The necklace consists of independent parts sewn using the „right angle weave“ stitch, ovals and circles made from cut beads. These are then connected using the rocailles either by creating a simple circle or once again using the principle of the „right angle weave“ stitch.

The oval

Step 1

Secure the end of the line by tying on 
a rocaille.

1

Step 2

String a row of FPB1 and FPB2 on the line: FPB2, 2x FPB1, 3x FPB2, 2x FPB1, 1x FPB2, 
7x FPB1, 2x FPB2, 1x FPB1, 2x FPB2 and 8x FPB1.

The oval - the initial row


2

Step 3

Thread the line through the strung beads and add the remaining ones (the yellow line in the drawing).


3

Step 4

Tie off the ends of the lines using two knots and leave the short end free. Continue threading the long end of the line through the inner circumference; don‘t forget the rocailles (the green line in the drawing). Sew it in. Hide the knot in the FPB2.


4 / a

The circle 

Step 5

Secure the end of the line by tying on a rocaille.


Step 6

String a row of FPB1 and FPB2: 2x FPB2, 1x FPB1, 3x FPB2, 1x FPB1, 3x FPB2, 1x FPB1, 3x FPB2, 1x FPB1, 3x FPB2, 1x FPB1 and 2x FPB2.

The circle - the initial row

6

Step 7

Thread the line through the strung beads and add the remaining ones (the yellow line in the drawing).

7

Step 8

Tie off the ends of the lines using two knots and leave the short end free. Continue threading the long end of the line through the inner circumference; don‘t forget the rocailles (the green line in the drawing). Sew it in. Hide the knot in the FPB2.

8 / a

The „Quatrefoils“ - the connection of the 4 ovals

Step 9

Connect the top FPB2 on the ovals using the rocaille circle. String 5x R between them. Tie it off using two knots. 
Hide the ends in the surrounding beads.

9

Step 10

Strengthen the top and bottom gaps with rocailles. Connect the FPB2 on the outer circumference at the two ovals. The larger arch is made up of 8x R and the inner one is made up of 5x R. Tie it off using two knots. Hide the ends in the surrounding beads. You can the hide the ends of the lines in the beads on the ovals where you no longer need to work.

10

The connection of the „quatrefoil“ and the ring

Step 11

Secure the end of the line by tying on a rocaille. Start at the inner circumference of the circle. Zigzag to the side rocaille circle. 
Sew it on. Return to the circle. Sew the central „figure of eight“. Return to the circle again. Sew a second rocaille circle. 
Zigzag through the circle to the place where you began. Tie off the ends of the lines using two knots and pull them into 
the surrounding beads. You can hide the other ends of the lines from the ovals.
 

11

The lower edge

Step 12

Secure the ends of the line by tying on a rocaille. You will create short bands between the lower edges of the ovals. The band is longest in the place where the ovals come together (arches made of 8x and 14x R). It is shorter in the places where they move away from each other (arches made from 6x and 12x R). Start at the oval‘s FPB2. String a row of rocailles and beads. Thread the line through the FPB
at the adjacent oval. Connect the strung beads and add the missing beads and rocailles. Tie off the ends of the lines and pull them into the surrounding beads.


12 / a

Attaching the fastening

Step 13

Link 2x FPB2. Turn the eye pins to face the same way. Strengthen the part of the protruding circles on the left and the right. Start at the FPB1 in the internal circumference and thread the line to the FPB2 from the external circumference. String 1x R, the eye of an eye pin and 1x R. Insert the needle into the next FPB2 and pass to the next FPB1 in the internal circumference. Thread the line through them once again. Tie off the ends of the line and pull them into the surrounding beads.


13

The fastening

Step 14

Link another FPB2 (5 – 6x). Once again turn the eyes to face the same way. Link 1x FPB3 on a pin. Connect the 6 or 8 mm rings. Suspend them to one of the sewn on, linked FPB2 using the ring. Connect the carabiner to the second linked bead at the opposite end using an oval.
 

14 / a

Hanging the FPB3

Step 15

Link 5x FPB3 on eye pins. Hang the beads on the lower edge in the centre of the band using the ovals or smaller rings.


15 / a

Downloads

This website is using cookies

To improve our services and provide information that suits your interest, we use the advanced website traffic analytics tools. However, we need your consent. More information about how we process and protect your data can be found in the privacy statement. We ask you for approval of the terms.

Functional cookies These cookies are necessary for the proper functioning of the website and therefore cannot be turned off.
Analytics cookies Analytical cookies help us track and analyze the way visitors interact with our site in Google Analytics 4. This information allows us to improve content and provide a better user experience.
Marketing cookies Reading and writing cookies for marketing purposes for advertising systems such as Google Ads or Sklik. These cookies allow us to track user behavior and measure website performance and the effectiveness of our advertising campaigns.
Personalized advertising Remarketing cookies allow us to present you with personalized advertising based on your previous interactions with our site in systems such as Google Ads, Sklik.
Use of personal data With this option, you consent to the sending and processing of your personal data to Google for the purposes of targeting and evaluating online advertising and targeted marketing.