Love at first sight

Difficulty: 2
Technique: sewing onto a sieve, eye pin linking

Red earrings made with PRECIOSA Farfalle

Create a pair of distinctive red earrings with a heart – a perfect accessory for Saint Valentine's Day! Use the glass seed beads known as PRECIOSA Farfalle, which are similar to bows or remind others of peanuts, and give free rein to your creativity to celebrate love in a unique way.

Ambassadors

Helena Chmelíková

She is able to switch from luxurious and extravagant fashion show pieces to the preparation of hobby projects,

Learn More

Material and Tools

Material

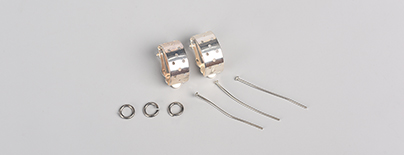
Curved earring clip; a 30 mm eye pin; 6 mm rings
Tools

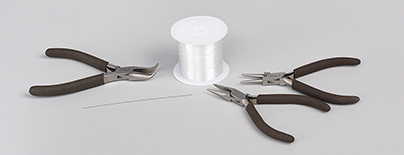
- 0.20 – 0.25 mm nylon line; a thin needle; scissors; pliers with a rounded point; flat-nose pliers
Procedure

Step 1

Thread 1 m of line into the needle's eye. String 2x F1. Thread the line through the outer corner hole of the shorter top edge of the curved rectangle from above. Thread the needle through the adjacent outer hole from inside the curve. String 1x F1. Tie off both parts of the line. The shorter end of the line should be approximately 15 cm long.

1 / a

Step 2

Thread the line through 1x F1 next to the knot and through the outer hole in the rectangle from inside the curve. Proceed to the next hole on the longer edge of the rectangle. Thread the line from the inside onto the top. String 3x F1. Thread the line through the adjacent hole by the other longer edge of the rectangle and do so towards the inside from the top. Move to the next hole on the longer edge, pass the needle through from inside onto the top. String 3x F1. Pass the line through the opposite hole at the edge of the rectangle. Continue threading the line through the holes in the rectangle and adding 3x F1 to the top. 6x sets of 3x F1 will be sewn on.

2 / a

Step 3

Reinforce all the sewn on F1 by sewing through them again. Thread the line through the adjacent hole on the rectangle from the inside. Pass the line through 3x F1. Pass the line through the hole and do so inwards from the top. Pass the line through the adjacent hole from the inside. Reinforce the F1 one more time. Proceed to the next outer hole. Pass the line through it and do so outwards from the inside. Thread the line through the next 3x F1 and inside through the hole from the outside. Pass the line through the adjacent hole from the inside. Reiinforce the F1 once again. Continue in this fashion until you have reinforced all the F1. The line will give the impression of a "ladder" on the back of the curve. When passing the line through the 3x F1 near the top shorter edge for the second time, only thread it through 2x F1.

3 / a

Step 4

Now, you'll add the top F2. String 3x F2. Thread the line through the central F1 from the adjacent 3x F1. String 3x F2. Thread the line through the central F1 from the following 3x F1. Continue in this way up to the last 3x F1. Add the missing curves of 3x F2. String 3x F2 and once again pass the line through the central F1. After threading the line through the central F1, tie off both ends of the line with three knots next to the top outer edge of the rectangle. Pull the ends into the surrounding F1 and F2. Cut them off.

4 / a

Step 5

String the PB onto an eye pin. Grasp the end of the protruding wire between the points of the needle-nose pliers. Twist the wire around the point of the pliers. Gently pull the pliers back along the edge of the PB hole. The created eye will be located centrally above the hole. Put a ring onto the eye. Also thread the ring through the central F1 at the outer edge of the rectangle. Close the ring.

5 / a

Step 6

Create the second earrings.

6

Downloads

This website is using cookies

To improve our services and provide information that suits your interest, we use the advanced website traffic analytics tools. However, we need your consent. More information about how we process and protect your data can be found in the privacy statement. We ask you for approval of the terms.

Functional cookies These cookies are necessary for the proper functioning of the website and therefore cannot be turned off.
Analytics cookies Analytical cookies help us track and analyze the way visitors interact with our site in Google Analytics 4. This information allows us to improve content and provide a better user experience.
Marketing cookies Reading and writing cookies for marketing purposes for advertising systems such as Google Ads or Sklik. These cookies allow us to track user behavior and measure website performance and the effectiveness of our advertising campaigns.
Personalized advertising Remarketing cookies allow us to present you with personalized advertising based on your previous interactions with our site in systems such as Google Ads, Sklik.
Use of personal data With this option, you consent to the sending and processing of your personal data to Google for the purposes of targeting and evaluating online advertising and targeted marketing.