Scilla

Difficulty: 3
Technique: simple sewing, right-angle weave stitch, stringing, wiring

Flower made of PRECIOSA PermaLux seed beads

Spring has yet to manifest itself in full strength and you are no doubt impatiently waiting for the first signs of life to bud. Redirect your anticipation and enthusiasm into the Scilla project. These spring bulbs bloom in ideal shades of purple, blue and pink from the range PRECIOSA PermaLux seed beads.

Ambassadors

Helena Chmelíková

She is able to switch from luxurious and extravagant fashion show pieces to the preparation of hobby projects,

Learn More

Procedure

Step 1

The flower

String 8x R14. Thread the line through the 2nd R from the top once again. Create a point. String 5x R14. Thread the line through the 1st R14 once again. Create an arch.

1

Step 2

String 8x R14. Thread the line through the 2nd R from the top once again. String 4x R14. Thread the line through the 2nd R14 in the arch of the 1st petal from the top. Thread the line through the 1st R14 from the 8 strung in this step. Repeat this procedure 3 more times. You will have now completed 5 petals.

2 / a

Step 3

String 1x R14. Thread the line through the 2nd R14 in the arch of the 1st petal. String 6x R14. Thread the line through the 2nd R14 again from above. String 4x R14. Thread the line through the 2nd R14 in the arch of the 5th petal. Thread the line through the 1st R14 strung in this step. Tie off the end of the line. Thread the ends of the line through the central circle consisting of 6x R14 from the left to the right. Cut them off.

3 / a

Step 4

Now thread the line through 2x R14 on the side of each petal, so that "cone" is formed. Thread the line through the R14 in the middle of the petal from the bottom. The R14 threaded from above will appear between the petals.

4 / a

Step 5

Create the stalk.
String 2x R17, 1x R8, the central circle of the flower, 1x R8 and 1x R14. Omit the R14, but thread the line through the rest one more time. String 3x R17 and 1x R8. Omit the R8 and thread the line through the R17 again. Tie off both ends of the line. Pull the ends in on the left and the right. Cut them off.

5 / a

Step 1

The leaf

Use the right-angle weave stitch when sewing.

Prepare 1 m of line. String 4x R17 and 3x R8. Thread the line through the R17 again from below. Move this group about 25 cm from the beginning of the line.

1

Step 2

Repeat the R17 and R8 stringing 9 more times (a total of 10 times) and create a group.

2

Step 3

String 7x R17. Thread the line through the 2nd from the top one more time. String 5x R17.

3

Step 4

String 4x R17. Thread the line through 3x R8 from Step 2 in the direction from the bottom to the top. Thread the line through 4x R17 once again. Continue in this way to the lower edge of the leaf.

4

Step 5

Sew both ends of the line into the R17. Omit the lower R17. Thread the line through several R17. Create a loop around the line between the R17. Thread the needle and line through this 2x. Tighten. Thread the line through several R17 again. Create a loop around the line - this time only thread the needle through it once. Tighten. Thread the line through several R17 and tighten the line.

5 / a

Step 6

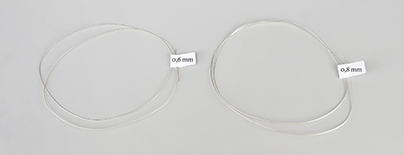
Prepare 30 cm of the 0.6 mm thick wire. Use the flat-nosed pliers to bend the top. The height of the wire arch is about 2 - 3 mm. Bring both sides of the arch together by crimping them between the jaws of the pliers.

6 / a

Step 7

Thread the wire with R8 from the top of the leaf. Twist the wire back after passing 3 cm through from the lower edge of the leaf.

7 / a

Step 8

Bring both parts of the wire closer together again using the pliers. Hold the wire with the flat-nosed pliers directly under the lower edge of the leaf. Twist the free end of the wire around the wire from the stringing twice. Then snip off the wire.

8 / a

Step 9

Create another leaf. The procedure is the same, but sew two more groups (a total of 12x) in Step 2.

9

Step 1

The stem

You will need four flowers created according to Steps 1-4 for each stem. Add a stalk (Step 5) to three flowers.

1

Step 2

Prepare 30 cm of the 0.8 mm thick wire. Use the flat-nosed pliers to twist the top. The height of the wire arch is about 2 - 3 mm. Bring the ends of both side of the arch together by crimping them between the jaws of the pliers.

2 / a

Step 3

String 1x R14, 1x R8, the central circle of the flower, 1x R8 and 5x R17 onto the wire. This part is the same for all the stems. You can choose the spacing of the flowers at your discretion. It is different on each stem
(A – 3x – a flower – 3x – a flower – 3x – a flower – 24x ks;
B – 2x – a flower – 2x – a flower – 2x – a flower – 30x;
C – 5x – a flower– 5x – a flower – 5x – a flower – 30x).

3 / a

Step 4

Twist the wire back after stringing 3 cm from the lower edge of the leaf. Bring both ends of the wire together using the pliers. Hold the wire firmly under the lower R8 with the flat-nosed pliers. Twist the end of the wire around the stringing wire twice directly under the R8. Then snip off the wire.

4 / a

Step 1

Assembly

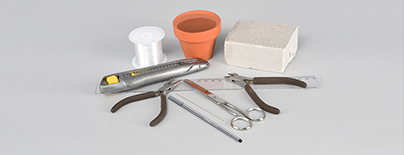
Shape the extruded polystyrene according to the internal area of the flowerpot. For example, place the flowerpot face down on the side of the polystyrene with the criss-cross pattern. Press down on the flowerpot. A circle will be imprinted into the polystyrene. Trace around its internal edge. Use the knife to diagonally cut the polystyrene around the circumference until you have created a cone.

1 / a

Step 2

Place the cone in the flowerpot. Poke the wire ends of the stems and leaves into the polystyrene.

2 / a

Step 3

Sprinkle R8 and R17 over the polystyrene. You can also use glue, but the parts of the decoration will no longer be able to be reused.

3 / a

Downloads

This website is using cookies

To improve our services and provide information that suits your interest, we use the advanced website traffic analytics tools. However, we need your consent. More information about how we process and protect your data can be found in the privacy statement. We ask you for approval of the terms.

Functional cookies These cookies are necessary for the proper functioning of the website and therefore cannot be turned off.
Analytics cookies Analytical cookies help us track and analyze the way visitors interact with our site in Google Analytics 4. This information allows us to improve content and provide a better user experience.
Marketing cookies Reading and writing cookies for marketing purposes for advertising systems such as Google Ads or Sklik. These cookies allow us to track user behavior and measure website performance and the effectiveness of our advertising campaigns.
Personalized advertising Remarketing cookies allow us to present you with personalized advertising based on your previous interactions with our site in systems such as Google Ads, Sklik.
Use of personal data With this option, you consent to the sending and processing of your personal data to Google for the purposes of targeting and evaluating online advertising and targeted marketing.