Kristi

Difficulty: 3
Technique: netting

Necklace made from rocailles and PRECIOSA Pip™ beads

Try out yet another use for the PRECIOSA Pip™ bead. This tutorial will assist you to create a handmade fashion accessory. The effective metallic reflections of the beads and seed beads from the PRECIOSA Traditional Czech Beads™ will excellently supplement your wardrobe on any occasion. You can choose a color combination according to your wishes thanks to the wide range of available colors and surface finishes. If you want to perfectly coordinate the accessories, you can also use more Pip beads to make earrings. We wish you many new ideas when working with beads and seed beads from the PRECIOSA Traditional Czech Beads™ brand!

Ambassadors

Olga Haserodt

Olga Haserodt was born in the Russian town of Astrakhan, but she has lived with her family in Germany for more than ten years. She came to love handcrafts during her childhood thanks to the influence of her mother and grandmother.

Learn More

Material & Tools

Tools

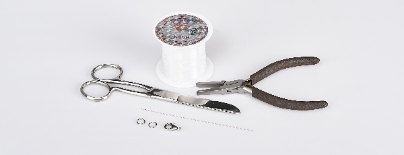
0.20 mm a nylon line; a long thin needle; scissors; a carabiner, rings, flat nose pliers (for flattening the beginning of the line, closing the rings)
Procedure

Step 1

Affix the rocaille in the middle of about 300 cm of line by passing the line through the rocaille twice. This rocaille will function as astop  bead and it will be removed later.

1

Step 2

String 1x R9, 2x R10, 1x R9, 2x R10, 1x R9 and 2x R10 and move them to the stop bead and thread the line through the first R9.

2

Step 3

String 2x R10, 1x R9 and 2x R10 and thread the line through the third R9 from step 2.


3

Step 4

String 2x R10, 1x R9, 2x R10, 1x P, 1x R9, 1x P, 1x R9 and 1x P and thread the line back through the R9, additionally string 2x R10, 1x R9 and 2x R10 and thread the line through the R9 from step 3.

4

Step 5

String 2x R10, 1x R9 and 2x R10 and thread the line through the R9.

5

Step 6

Repeat step 5 seven times.

6

Step 7

Repeat steps 3 – 6 until the necklace reaches the required length.

7

Step 8

Repeat step 5 twice at the end.

8

Step 9

Sewing up the necklace. The stitch ends in the R10. String R9 and sew through 2x R10. Repeat till the end of the row. Continue in the  sewing. The stitch ends in the R10. Sew through the second half of the necklace according to the illustration.

9 / a

Step 10

Attach the fastening. Sew in and cut off the remainder of the line. The necklace is finished.

10 / a

Downloads

This website is using cookies

To improve our services and provide information that suits your interest, we use the advanced website traffic analytics tools. However, we need your consent. More information about how we process and protect your data can be found in the privacy statement. We ask you for approval of the terms.

Functional cookies These cookies are necessary for the proper functioning of the website and therefore cannot be turned off.
Analytics cookies Analytical cookies help us track and analyze the way visitors interact with our site in Google Analytics 4. This information allows us to improve content and provide a better user experience.
Marketing cookies Reading and writing cookies for marketing purposes for advertising systems such as Google Ads or Sklik. These cookies allow us to track user behavior and measure website performance and the effectiveness of our advertising campaigns.
Personalized advertising Remarketing cookies allow us to present you with personalized advertising based on your previous interactions with our site in systems such as Google Ads, Sklik.
Use of personal data With this option, you consent to the sending and processing of your personal data to Google for the purposes of targeting and evaluating online advertising and targeted marketing.