Handbag

Difficulty: 3
Technique: right-angle weave stitch

Creative work using PRECIOSA Fire Polished Beads

Try making a handbag from PRECIOSA Fire Polished Beads. Select a surface finish with reflections in a variety of shades that go perfectly with the autumn-winter trends of the 2024/2025 season.

Ambassadors

Helena Chmelíková

She is able to switch from luxurious and extravagant fashion show pieces to the preparation of hobby projects,

Learn More

Material and Tools

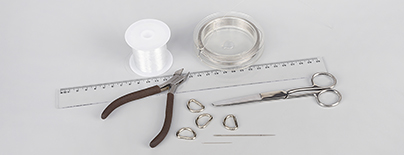
Tools - the bag

A thin needle; scissors; snipping pliers; a 0.25 mm line; a regular 0.30 mm steel wire; a large tailor's needle; a ruler; 15 mm D-rings
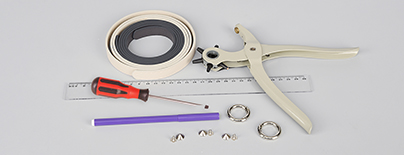
Tools - the handle

A bag handle – a 1.5 cm x 120 cm semi-product; a ruler; a felt pen; a leather hole puncher; decorative screw-on rivets with a diameter of 9.5 mm; a screwdriver according to the screw heads; a fastening – a handbag ring
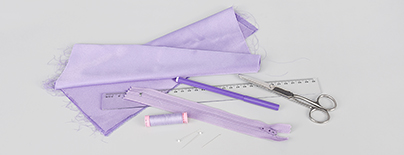
Tools - the pocket

Satin fabric (about 50 cm x 25 cm); tailor's thread (no. 120); a 12 cm zip; a felt pen; a ruler (straight with a right angle); a small tailor's needle; tailor's scissors; pins; a sewing machine (a regular and a zipper pressure foot); an iron; an ironing board
Procedure

The bag

The sewing method, the right-angle weave stitch, is not that complicated. The handbag is demanding mainly due to the amount of time that it requires: approximately 15 hours.


The base of the bag consists of a rectangle of 60 rows and 20 columns (38 cm x 13 cm). You can sew three rows with 160 cm of line (an arm span). Always string 1x FPB as a stop bead at the start of the line (thread the line through it twice).

Step 1

Step 1 – the 1st row

The red line
String 43x FPB onto the line. Connect the last 4x FPB by passing the line through the 4th bead from the end again. You have just created the first "square". Each square is connected to the next. The neighbouring squares always have 1 FPB in common. The entire handbag is created using this interconnection.

1 / a

The black line

String 1x FPB. Move another 2x FPB from the stringing to the 1st "square" and pass the line through the 2nd one. Continue in this way until you have used up almost all the FPB from the stringing. 3x FPB will remain at the end. Now tie off both ends of the line.

/ a

Step 2

Thread the line through 1x FPB at the edge of the row next to the knot. You have now completed the row. It contains 20 interconnected "squares", the basis for the 20 columns.

2

Step 3

Step 3 – the 2nd row

The red line
Leave the line slightly loose when stringing. String 3x FPB above the 1st "square" and then above every second one. Affix the line by threading it through the top FPB next to the "squares" without a FPB curve. String 2x FPB at the last "square". Create the "square" by connecting the FPB.

3 / a

The black line

Thread the line through the 3 bottom FPB next to the penultimate "square". Add 1 top FPB at the 3rd "square" from the end and thread the line through the side FPB. Continue similarly up to the edge of the row. Thread the line through the 1st "square" one more time and up to the top FPB. Now tighten the line by pulling behind the outer FPB. Proceed from the beginning of the red line all the way to the end. Then continue from the beginning of the black line all the way to the end.

/ a

Step 4

Step 4 – the 3rd row
Continue in the same way as in the 2nd row. String 3x FPB according to the red line. Start above the 2nd "square" in the row. Add FPB and thread the line through them according to the black line.

4 / a

Step 5

Sew the line in. Do not place the knot in the outer FPB of the sewn section. Thread it through several FPB. Create a loop around the line between the FPB. Thread the needle and line through it twice. Tighten. Sew through several more FPB. Create another loop. Thread the line through it once. Once again thread it through several FPB and cut the line.

Step 6

Connect a new line. Proceed similarly to when fastening off. Thread the line through several FPB. Create a knot. thread several FPB. You should finish threading the line through the FPB in the upper outer FPB of the outer "square".

Step 7

If you have threaded the line through the outer FPB in the direction out from the sewn section, repeat the procedure in the 2nd row and then in the 3rd row. If you have threaded the line in the direction towards the sewn section, first repeat the procedure from the 3rd row and then the 2nd row.

7

Step 8

Keep adding rows until there are 60.

8

Step 9

Fold the rectangle in half so that the base consists of two rows. The sides will also be from two rows.

9

Step 10

The sides
Take a new piece of line for each row. There will be 29 rows along its length. Start sewing from the fold in the rectangle. You can now do the right-angle weave stitch. You can also calculate how to string and add the FPB (see the red and black lines). It is difficult to tighten the second row. Pull on the line between the FPB using the point of the tailor's needle.

10 / a

Step 11

The projections for attaching the strap
Snip off 2 x 50 cm of wire. Count off five "squares" from the edge of the bag at the side. Place the centre of the wire in the lower FPB next to the 5th "square" from the top. Alternately sew the left and right-hand parts of the wire through the 4th, 3rd, 2nd and 1st squares. String 2x FPB onto one part of the wire. String 1x FPB onto the other part of the wire and connect them in the top FPB. Repeat this 3 more times. Do the same with the second piece of wire. Only some FPB will already be sewn in in the first projection. String 1x FPB at a time onto the wire
.

Connect the two-row projection with the edge of the bag. String a D-ring onto the projection. Thread the wires through the outer FPB on the sides. Thread the ends of the wire in the middle of the projection through the central FPB. Thread the ends of the wire leading from the projection through the "square" that is immediately next to the side "squares". Once again pass it through 2x FPB in the first "squares" from the projection. Tie off the ends of the wire. Thread the ends of the wire through the FPB: through several FPB in the direction towards the side, but only through 1x FPB in the direction towards the centre of the projection. Cut it off.

11 / a

The handle

Step 1

Punch a hole in the centre of the strap 1 cm the end using the hole puncher. Punch another hole 6 cm away on both sides of the strap.

1 / a

Step 2

String a D-ring onto the strap. Fold the strap so that the holes align. Insert a screw and firmly attach the "nut" from the other side.

2 / a

Step 3

Use the fastening (a ring) to attach the strap to the D-ring on the case.

3 / a

The lining

Step 1

Measure the bag's length once you have sewn it (without the width of the base – without 2 rows): in the example, it is 18 cm. Measure its width (without the outer FPB in the outer columns). It should correspond to the length of the zip: in the example, it is 12 cm.

1 / a

Step 2

Cut a rectangle of 38 cm × 19 cm from the fabric. 2x the length + an added 1 cm on each side (2x 18 + 2x 1 = 38). 1x the width + an added 3.5 cm on each side (12 + 2 x 3.5 = 19).

2

Step 3

Hem the edges of the rectangle with an overcast stitch (a zig-zag stitch). Iron it.

3

Step 4

 Pin the zip onto the shorter edge of the rectangle on the front (shiny) side. Turn the zip with the inside upowardstop opf. Mark the centre of the zip and the rectangle's shorter edges with pins. Place the pins in the fabric and the zip on one another. Connect the edges of the fabric and the zip using several pins. Use the zipper pressure foot to sew along both sides of the zip from end to end. The central line between the teeth of the zip should lead down the edge.

4 / a

Step 5

Fold the ends of the zip without any teeth towards the section with teeth. Pin them. It will be easier to sew them in.

5

Step 6

Turn the fabric with the sewn zip the right side (i.e. the shiny side) out. Pin the long edge of the fabric along both sides. Sew them with a straight stitch about 1.5 cm from the edge. Preferably use the zipper pressure foot. Turn the pocket outside in. Iron it.

6 / a

Step 7

Fold the free additional edges on the zip towards the sewn section. Stitch the ends of the zip to the edge.

7

Step 8

Sew the lining to the bag in several places.

8 / a

Downloads

This website is using cookies

To improve our services and provide information that suits your interest, we use the advanced website traffic analytics tools. However, we need your consent. More information about how we process and protect your data can be found in the privacy statement. We ask you for approval of the terms.

Functional cookies These cookies are necessary for the proper functioning of the website and therefore cannot be turned off.
Analytics cookies Analytical cookies help us track and analyze the way visitors interact with our site in Google Analytics 4. This information allows us to improve content and provide a better user experience.
Marketing cookies Reading and writing cookies for marketing purposes for advertising systems such as Google Ads or Sklik. These cookies allow us to track user behavior and measure website performance and the effectiveness of our advertising campaigns.
Personalized advertising Remarketing cookies allow us to present you with personalized advertising based on your previous interactions with our site in systems such as Google Ads, Sklik.
Use of personal data With this option, you consent to the sending and processing of your personal data to Google for the purposes of targeting and evaluating online advertising and targeted marketing.