Delicacy Glamore

Difficulty: 3
Technique: stringing, basic beadweaving

Lace and seed bead collar

Delicacy, fragility and elegance are represented by this lace and seed bead collar which will emphasise your beauty and femininity. The combination of cotton lace and the seed bead decoration looks absolutely flawless and natural. So don’t hesitate to try making your own lace and seed bead fashion accessory using seed beads from the PRECIOSA Traditional Czech Beads™ brand. We wish you many elegant inspirational ideas when working with Czech beads and seed beads from the PRECIOSA Traditional Czech Beads™ brand.

Ambassadors

Helena Chmelíková

She is able to switch from luxurious and extravagant fashion show pieces to the preparation of hobby projects,

Learn More

Materials & Tools

Other materials

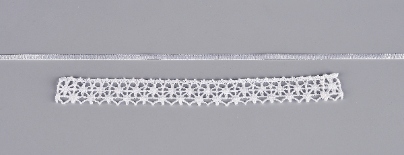
Textiles:
1 m of narrow, white 0.40 cm ribbon, lace with a width of 1.5 – 2 cm, length 42 cm (40 cm + 2 cm for overcastting), it can be straight from both sides or with arches from the sewing side
Tools

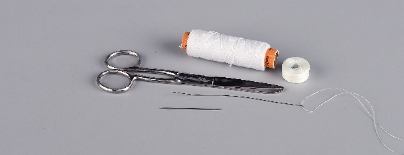
A thin needle with a large eye, scissors, a white thin thread (Belfil S–50 – polyester, LI04 – nylon)
Procedure

If the project doesn’t display correctly, download it in pdf format. 

Step 1

Thread the ribbon through about the 40 cm long piece of lace (fig. no. 1a + 1b + 1c). The ribbon should protrude upwards
at both ends (fig. no. 1d). If it does not work at this length, it is possible to extend the lace. Sew the end of the lace gently, but firmly (fig. no. 1e). Carefully melt the ends of the ribbon (fig. no. 1f ). Use the ribbon to gently pull out the lace to a length of about ca 35 cm and twist it slightly.

1 / a

Step 2

In this collar, the lace is decorated with 33 arches (1 arch measures about 1.20 cm) (fig. no. 2a). Stretch it out twice and pull off the thread and cut the end. Pass the thread through the eye of the needle. Tie the ends of the thread using a weaver’s knot (this knot is used very often in the textile industry when connecting threads, see figure 9d). Move the knot to the final arch on the thread. Thread the end arch of the thread through the first arch of the lace and thread it through
the needle (fig. no. 2b + 2c). Tighten it (fig. no. 2d). Proceed similarly when adding new threads.

Every new rocaille arch consists of 14x R10 (fig. no. 2e). String 14x R10 for the first arch and carefully pull them across
the knot (fig. no. 2f + 2g). Add 13x R10 in the following arches (fig. no. 2h). The top R10 are common for two neighbouring arches. There are 32 arches in the first row. The arches should make an even number. The next row of arches is attached precisely in the middle of the arch from the previous row.

2 / a

Step 3

At the last arch in the first row, thread the line through the seed beads once again in the direction back towards the centre
of the arch (fig. no. 3a). Create a loop of thread around the R10. Pass the thread through it twice (fig. no. 3b + 3c). Tighten and place it in the gap between the R10 (fig. no. 3d). Pass the thread through a few more R10 (fig. no. 3e). Try to hide the knot in the holes (fig. no. 3f ). Cut off the thread (fig. no. 3g).

3 / a

Step 4

Start stringing the next row of arches with 16x R10. The first arch consists of 16 beads, while the others consist of 15. Create a total of 31 arches. Once again, thread the line back though the seed beads towards the centre when you reach the last
arch. 

Then string 16x R10 in the first arch in the next row and 15 in the following ones. Create a total of 30 arches.

Step 5

Add MCBR5 sewn around with a ring of R10 rocailles to the arches in the last row (fig. no. 5a). The arch consists of 8x
R10 from both sides, while there is 1x R8 in the middle. 13x R10 are strung around the MCBR5. String 8x R10, 1x R8, 13x R10
onto the first arch and pass the needle and thread back to the R8, but this time from the opposite side. Pass the line through 3x R10 from the circle. String the MCBR5, count off 3x R10 before the R8 on the other side of the circle and pas the line through them, including through the R8. Add 8x R10 and pass the line under the second arch from the previous row in its centre and return to the last of the 8 rocailles. Continue similar in the following arches, but only string 7x R10 at the start. Create a total of 29 arches.

5 / a

Step 6

The weaver’s knot

This is used to tie off the thread. The knot is strong but sufficiently small to allow us to pull small seed beads over it. Grasp both ends of the thread between the thumb and the index finger of the left hand. The left-hand end is below and the
right-hand end is above (fig. no. 6a + 6b).

6 / a

Step 7

Grasp the thread leading downwards from the thumb and pass it behind the left-hand end across the thumb (fig. no. 7).

7

Step 8

Grasp the right-hand end and pass it through the created loop from above (fig. no. 8).

8 / a

Step 9

Now, it will be oriented towards the left (fig. no. 9a). Take both ends and pull the right-hand one to tighten the knot and
cut the ends (figure no. 9b + 9c + 9d + 9e).

9 / a

Downloads

This website is using cookies

To improve our services and provide information that suits your interest, we use the advanced website traffic analytics tools. However, we need your consent. More information about how we process and protect your data can be found in the privacy statement. We ask you for approval of the terms.

Functional cookies These cookies are necessary for the proper functioning of the website and therefore cannot be turned off.
Analytics cookies Analytical cookies help us track and analyze the way visitors interact with our site in Google Analytics 4. This information allows us to improve content and provide a better user experience.
Marketing cookies Reading and writing cookies for marketing purposes for advertising systems such as Google Ads or Sklik. These cookies allow us to track user behavior and measure website performance and the effectiveness of our advertising campaigns.
Personalized advertising Remarketing cookies allow us to present you with personalized advertising based on your previous interactions with our site in systems such as Google Ads, Sklik.
Use of personal data With this option, you consent to the sending and processing of your personal data to Google for the purposes of targeting and evaluating online advertising and targeted marketing.